“The value of a system is often defined by how well it integrates with other systems”
The best software is limited if you cannot integrate it with existing frameworks. In the case of Camunda, this fact is all the more true. Imagine a workflow automation engine without a way to interact with the existing software.
That is why Camunda created external service tasks, enabling us to create a client in any programming language. With that, we can interact with camunda from virtually every existing software application.
In the following blog, we show you how this is achieved in Ruby on Rails. We will guide you on how to create your own Ruby Worker.
Disclaimer
Please note that the installation will be done on Windows using JetBrains IntelliJ as an IDE.
Further, we will use an integration gem for Camunda called
Camunda-Workflow created here:
https://github.com/amalagaura/camunda-workflow
If you intend to use another gem, please note that some steps will differ.
Installation of Ruby
- Please download the most recent ruby installer from here: https://rubyinstaller.org/downloads/
- We recommend that you download the installer labelled Ruby+Devkit + version
- Ruby has issues with spaces in the file path. So please take care of that when choosing the installation directory
- Install all dev tools of the installer
- To verify that you have everything installed correctly, you should be able to run the following:
1 ruby --version
Installation of Node.js
- Please follow the installation guide for node https://nodejs.org/en/download/
- To verify that you have everything installed correctly, you should be able to run the following:
1 node --version
Installation of yarn
- Please follow the installation guide for yarn https://classic.yarnpkg.com/en/docs/install
- To verify that you have everything installed correctly, you should be able to run the following:
1 yarn --version
Installation rails
- To install Rails, use the
gem installcommand provided by RubyGems:1 $ gem install rails - To verify that you have everything installed correctly, you should be able to run the following:
1 $ rails --version
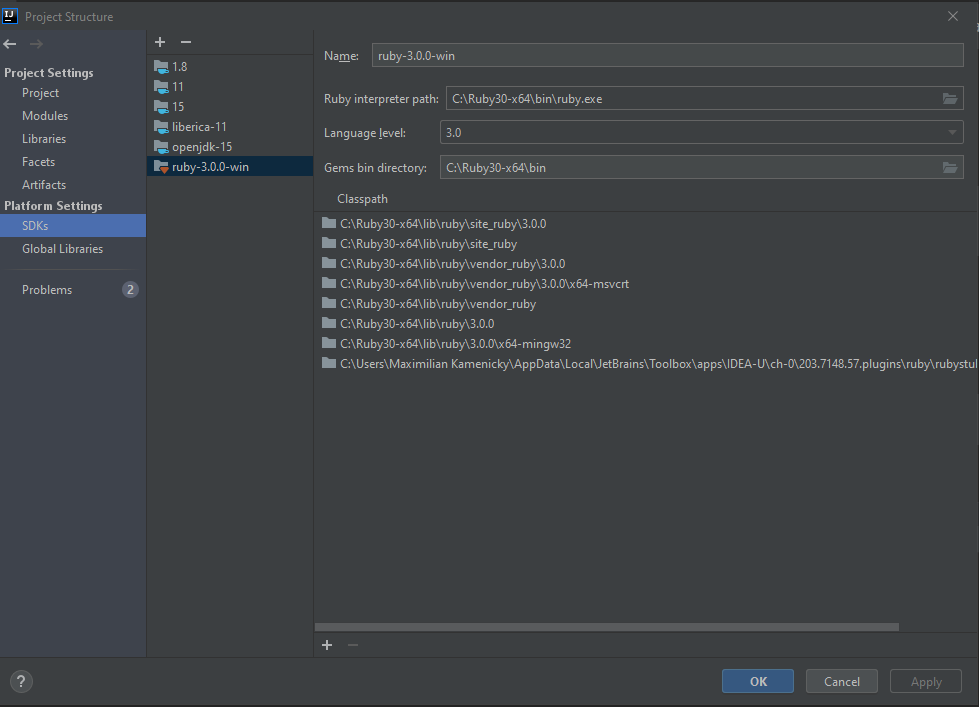
Configuration of IntelliJ
- please install the correct ruby plugin
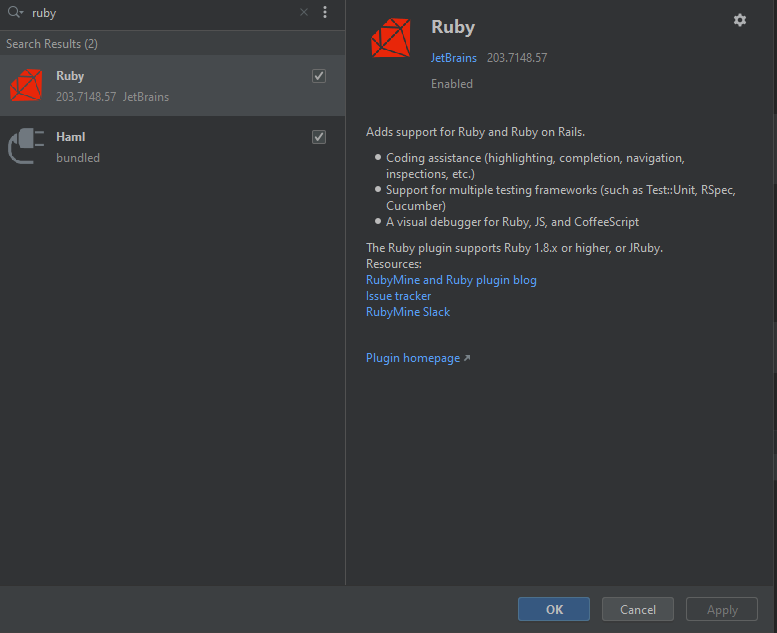
- Configure the installed ruby SDK in IntelliJ
Creation of Project
After that, we can jump into the creation of an external task client in IntelliJ. For that follow the following steps:
1. Create a new project
2. Choose ruby on rails
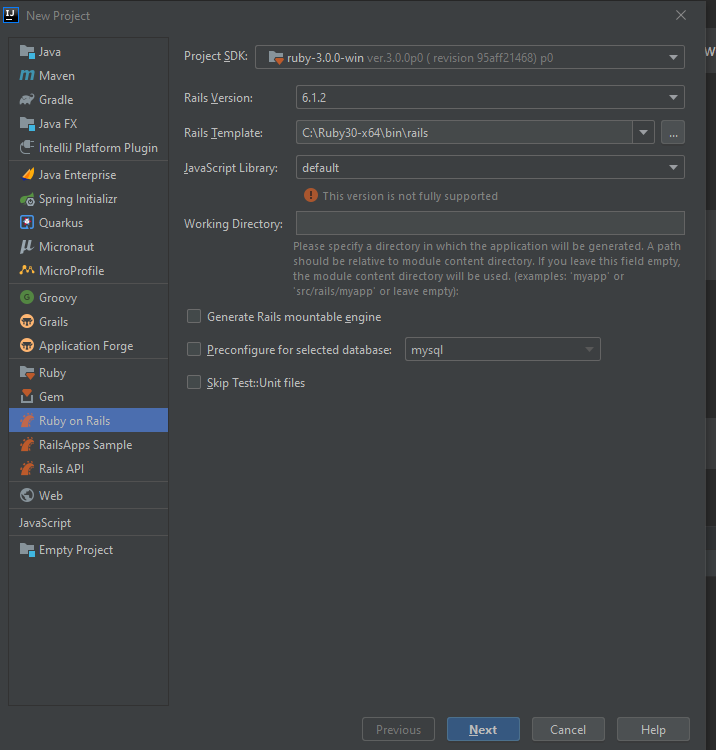
- Click next and finish
- A new ruby project will be generated and will have the following folder structure:
1│ ├───app2│ ├───assets 3│ │ ├───config 4│ │ ├───images 5│ │ └───stylesheets 6│ ├───channels 7│ │ └───application_cable 8│ ├───controllers 9│ │ └───concerns 10│ ├───helpers 11│ ├───javascript 12│ │ ├───channels 13│ │ └───packs 14│ ├───jobs 15│ ├───mailers 16│ ├───models 17│ │ └───concerns 18│ └───views 19│ └───layouts 20├───bin 21├───config 22│ ├───environments 23│ ├───initializers 24│ ├───locales 25│ └───webpack 26├───db 27├───lib 28│ ├───assets 29│ └───tasks 30├───log 31├───node_modules 32├───public 33├───storage 34├───test 35│ ├───channels 36│ │ └───application_cable 37│ ├───controllers 38│ ├───fixtures 39│ │ └───files 40│ ├───helpers 41│ ├───integration 42│ ├───mailers 43│ ├───models 44│ └───system 45├───tmp 46└───vendor 47.browserslistrc 48.gitattributes 49.gitignore 50.ruby-version 51.babel.config.js 52.basic-ruby-project.iml 53.config.ru 54.Gemfile 55.Gemfile.lock 56.package.json 57.postcss.config.js 58.Rakefile 59.README.md 60.yarn.lock
Configuration of the Project
- In the GemFile we will now add an existing camunda gem for external tasks called ‘camunda-workflow’. For this please add the following lines to the GemFile.
1 #camunda workflow2 gem 'camunda-workflow', '~> 0.2.3'
- We now need to install the gems like this:
1 bundle install
- With this, we can use the gem in our application.
- We will now create the initializer as described in https://github.com/amalagaura/camunda-workflow
1 # filename config/initializers/camunda.rb2 Camunda::Workflow.configure do |config|3 config.engine_route_prefix = 'engine-rest'4 end
- This configuration defines the endpoint specifics for the rest engine.
Creation of worker
- For the creation of the worker we start by creating the job interface for all the external task jobs in the directory:
app > job > create camunda_job.rb1 class ApplicationJob < ActiveJob::Base ## this is the base class for ruby jobs2 end34 class CamundaJob < ApplicationJob #this is the base class for all camundaJobs5 include Camunda::ExternalTaskJob #must include the camunda-workflow interface for ExternalTaskJob6 end
- The camunda_job.rb is what allows us to use the camunda gem in our application. With that, we tell the program to rely on Camunda::ExternalTaskJob for the class camunda_job.rb
- Now let’s create an external task job for the process (in our case a simple process posting on Twitter) in the directory: app > bpmn > create twitter_qa_process.rb
1 module TwitterQaProcess #process-definition-key (needs to be snake-case for ruby)2 class ActivityInformUser < CamundaJob #the external task task-id extending our camundaJob interface3 def bpmn_perform(variables) #this method is part of the CamundaJob interface4 # A hash returned will become variables in the Camunda BPMN process instance5 end6 end7 end
- The file twitter_qa_process.rb is the responsible file for one process.
- The defined class ActivityInformUser is the direct relation to the external Task ID.
- With that, all steps are completed. To now run the jobs please open the terminal and run:
1 rails console23 Loading development environment (Rails 6.1.1)4 irb(main):001:0>56 Camunda::Poller.fetch_and_queue %w[TOPICNAME]
Afterwards, it will poll and complete tasks as long as one with the topic exists.
Related articles
https://github.com/amalagaura/camunda-workflow
Useful Links:
More about Service Tasks: Official Documentation
Written by Maximilian Kamenicky
Developer at J-IT IT-Dienstleistungs Gesmbh
Photo by Michael Dziedzic on Unsplash


